Indulge Guilt-Free: The Ultimate Vegan Snickers Cheesecake – Gluten-Free & Refined Sugar-Free
Are you a devoted Snickers fan yearning for a dessert that’s not only rich and luscious but also aligns with your health goals? Look no further! This incredible vegan Snickers cheesecake is designed just for you. It masterfully captures all the iconic Snickers flavors – creamy peanut butter, wonderfully gooey caramel, and rich chocolate – all while being completely gluten-free and refined sugar-free. Prepare to be amazed by this wholesome indulgence!

For those who’ve been with me for a while, you’ll know that if there’s one dessert that truly captures my heart, it’s a raw vegan cheesecake. It was the gateway that introduced me to the wonderful world of whole-food baking – or, as I sometimes call it, “un-baking.” And when it comes to classic candy bars, if there’s a Snickers option on the menu, I’m absolutely choosing it every single time. Combining these two passions felt like destiny, leading to the creation of this spectacular dessert.
While this particular vegan Snickers cheesecake isn’t entirely raw due to the caramel sauce requiring some heat, it wholeheartedly embraces the philosophy of using primarily whole-food ingredients and completely avoids any added refined sugar. It’s a testament to how utterly delicious and satisfying a healthier dessert can be!
What is a Vegan Cheesecake Made Out Of? Exploring the Creamy Core
Vegan cheesecakes offer a surprisingly versatile and delicious alternative to their dairy-based counterparts. There are several creative ways to achieve that signature creamy texture without using any animal products. My personal favorite method, and one that yields an incredibly rich and smooth result, involves using raw cashews. When soaked, these humble nuts soften beautifully, allowing them to blend into a luxuriously smooth cream that forms the perfect base for a cheesecake. However, other fantastic bases exist, including tofu, coconut yogurt, or even simply a rich nut butter.
For this specific vegan Snickers cheesecake, we’re harnessing the power of both cashews and peanut butter to create an unforgettable flavor and texture. While the main body of the cheesecake relies on soaked cashews for its decadent creaminess, a generous amount of peanut butter is incorporated to infuse every bite with that authentic, nutty Snickers taste. This combination means you get the best of both worlds: the smooth, melt-in-your-mouth consistency from cashews, deeply flavored with the irresistible essence of peanuts. It’s a little trick that makes this recipe truly special and surprisingly simple to execute!
Why You’ll Absolutely Adore This Vegan Snickers Cheesecake
This dessert isn’t just another recipe; it’s an experience. Here’s why this vegan Snickers cheesecake will become your new favorite:
- Unbelievably Rich and Delicious! This cheesecake is so intensely flavorful and boasts such a perfect texture that you could serve it to anyone, regardless of their dietary preferences, and I can almost guarantee they wouldn’t guess it’s vegan or refined sugar-free unless you explicitly told them! It’s designed to impress even the most discerning dessert connoisseurs. Each spoonful delivers a burst of decadent flavor that truly satisfies.
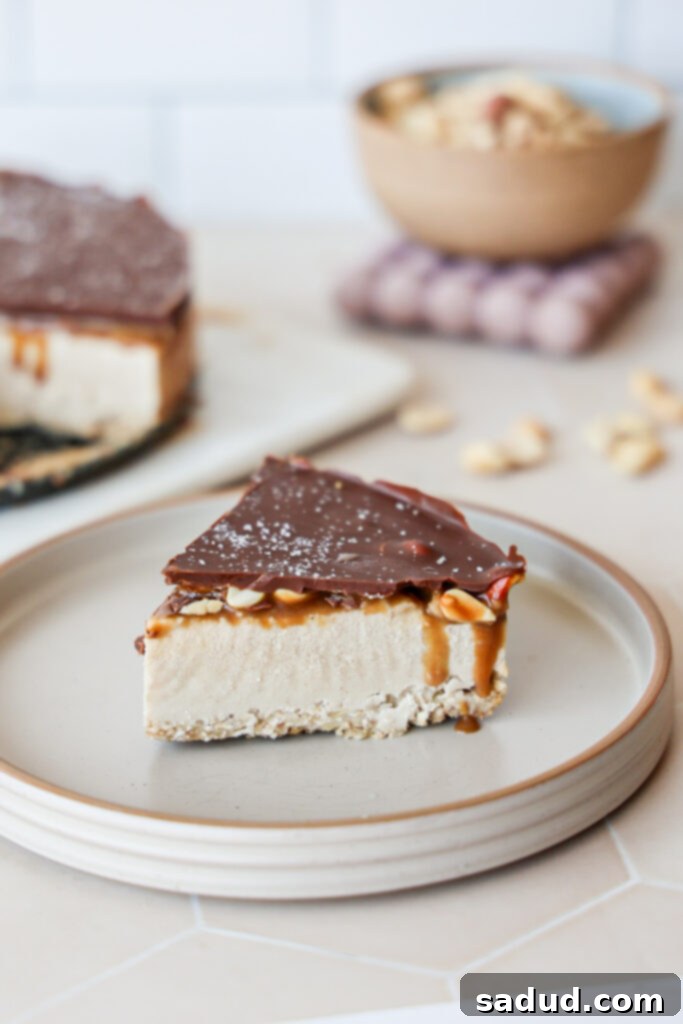
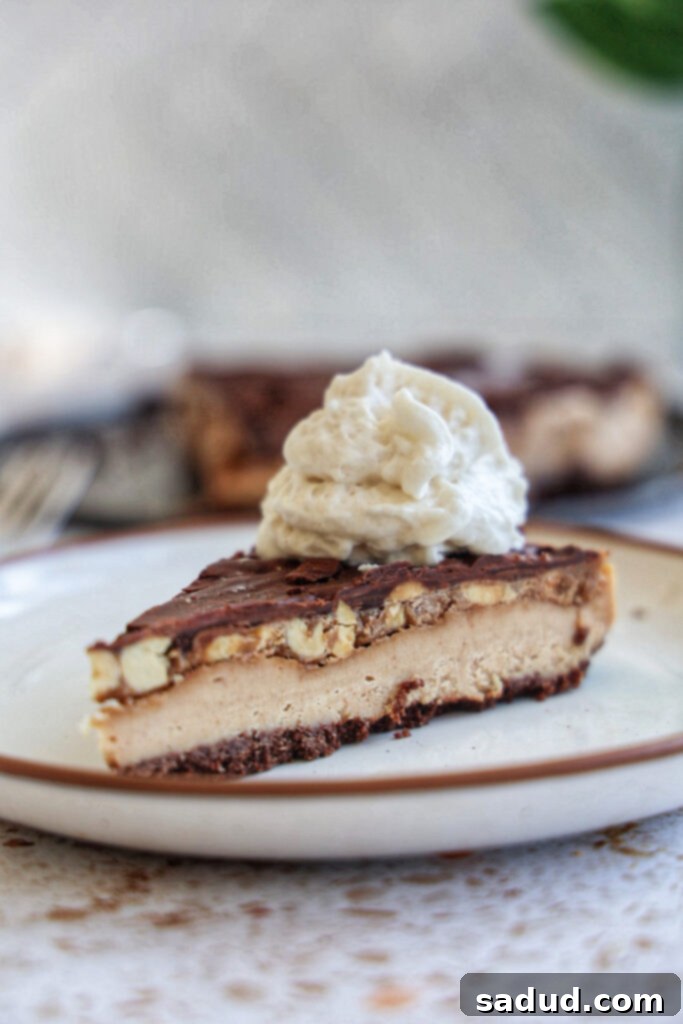
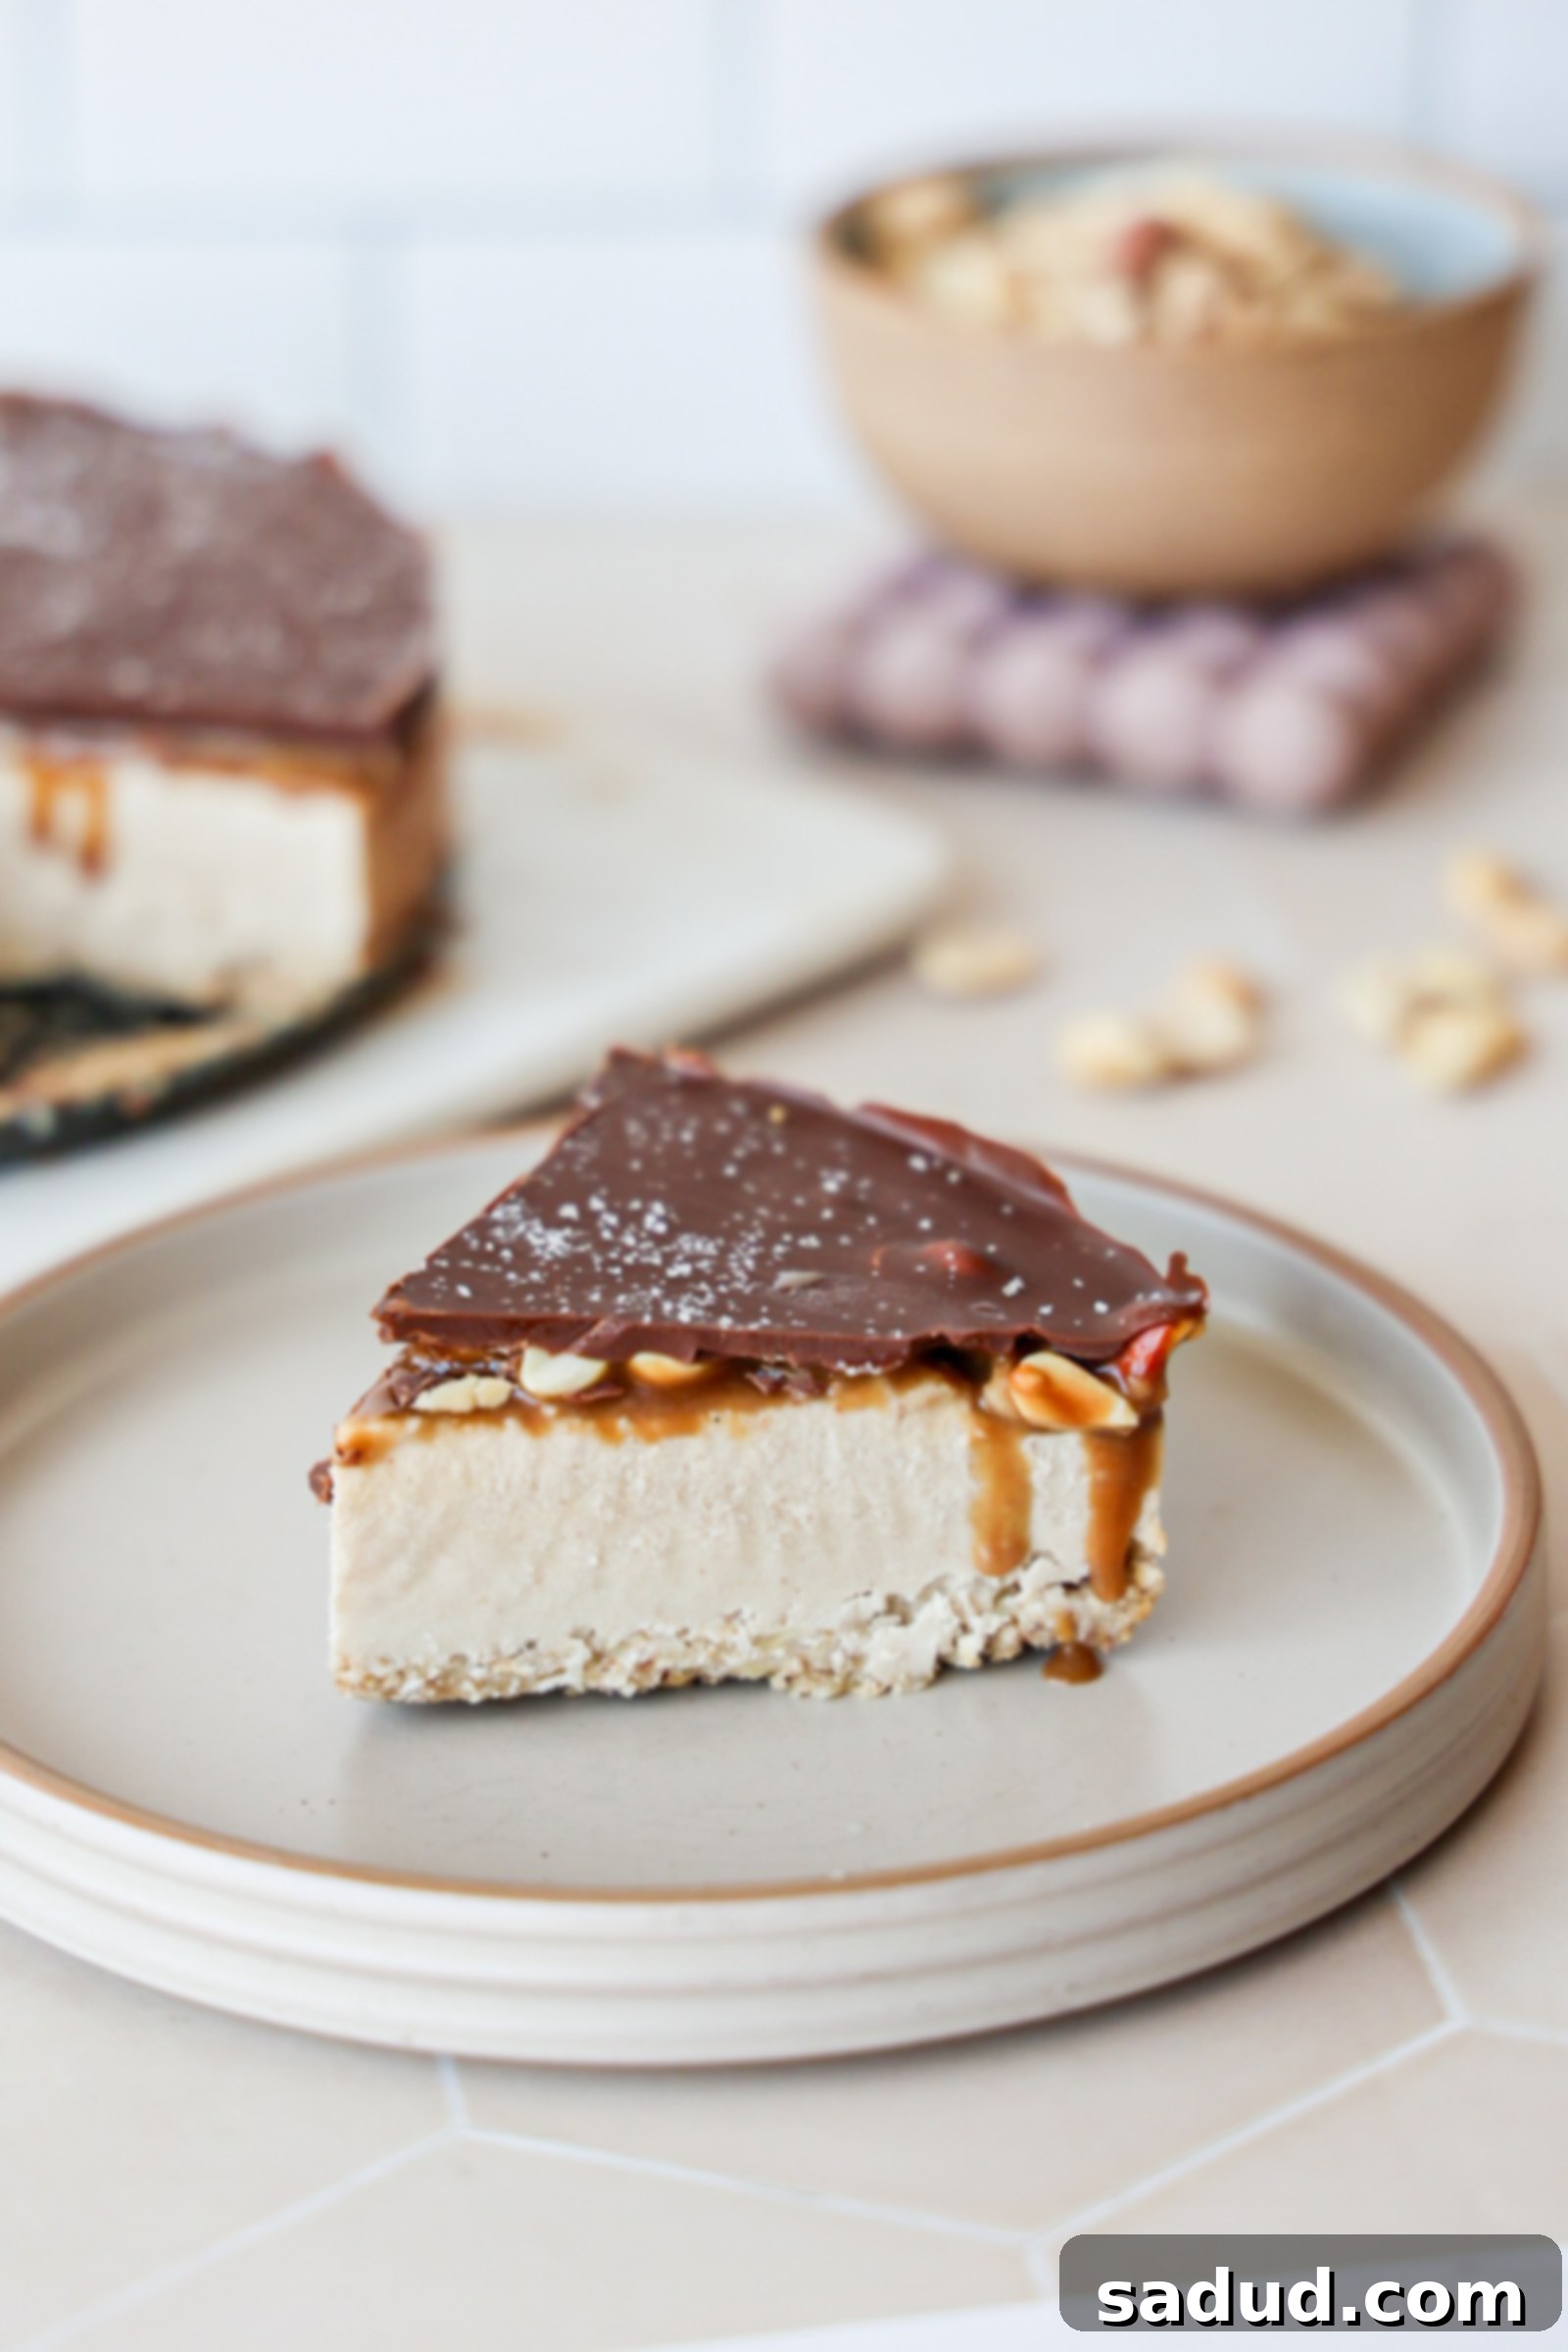
- A Feast for the Eyes: The Layers! Beyond its incredible taste, this is one of those cheesecakes that is undeniably stunning. Its beautifully defined layers make it a true showstopper. You’ll enjoy an earthy, satisfying oaty base, followed by a thick, rich peanut butter cheesecake filling. Next comes a luscious, gooey caramel layer studded with crunchy peanuts, all crowned with a smooth, glossy chocolate topping. Every layer contributes to a harmonious blend of textures and flavors, making each slice a work of art.
- Surprisingly Easy to Make: While multi-layered vegan cheesecakes can sometimes appear intimidating, this recipe is remarkably straightforward. The majority of the process involves simple blending and chilling. The caramel layer is arguably the most time-consuming part, requiring a little patience and frequent stirring, but the resulting deep, complex flavor is so incredibly worth every minute. Don’t let the layers fool you; this dessert is accessible even for novice bakers.
- Wholesome Goodness: Gluten-Free, Refined Sugar-Free & Made with Wholesome Ingredients! In an age where healthy eating is paramount, this cheesecake stands out. It caters to multiple dietary needs, being entirely gluten-free and free from refined sugars. Each component is crafted from wholesome, natural ingredients, allowing you to indulge in a genuinely delicious dessert without any of the guilt often associated with traditional treats. It’s proof that healthy can be utterly delicious!
Snickers Cheesecake Recipe Video
How to Make This Irresistible Snickers Cheesecake
For precise measurements and detailed step-by-step instructions, please refer to the comprehensive recipe card located at the bottom of this post.
Essential Equipment for Your Cheesecake Journey
Having the right tools can make all the difference in achieving a perfectly smooth and layered cheesecake. Here’s what you’ll need:
- Food processor: This is crucial for creating the perfect crumbly, yet cohesive, base layer. It also makes quick work of chopping nuts or oats.
- Blender: A high-speed blender is key for achieving that incredibly smooth and creamy cheesecake filling. I personally adore my Vitamix for its ability to create an ultra-silky texture, ensuring no cashew lumps remain!
- 8″ Springform pan: This pan is ideal for cheesecakes as its removable sides allow for easy, clean removal of your finished dessert. If you prefer, you can also transform this recipe into convenient bars by using an 8×8 inch square pan. A 9-inch springform pan will also work, though your layers might be slightly thinner.
Key Ingredients & Thoughtful Substitutions
Crafting this Snickers cheesecake with whole-food ingredients is simple, and many components offer flexibility:
- Peanut Butter: This ingredient is vital for imparting the classic Snickers flavor, forming a significant part of the cheesecake’s base and overall profile. It’s crucial to use a natural peanut butter, ideally with just peanuts or peanuts and sea salt as ingredients, to avoid unwanted added sugars and oils. If you have a peanut allergy or prefer another flavor, almond butter or cashew butter can be substituted, though they will slightly alter the distinctive Snickers taste.
- Maple Syrup: As the primary sweetener in this recipe, pure maple syrup offers a rich, natural sweetness. Feel free to swap it with other sticky sweeteners like agave nectar or date syrup, adjusting the quantity to your preferred level of sweetness.
- Chocolate chips: You can use any chocolate chips you have on hand, but for a truly refined sugar-free experience, opt for high-quality dark chocolate chips. I particularly love Hu Kitchen chocolate chips, and you can often find a discount using “danishealthyeats.” Choose a brand that aligns with your dietary needs, whether it’s vegan, sugar-free, or a specific cocoa percentage.
- Coconut milk: For the caramel layer, full-fat canned coconut milk is highly recommended. The fat content is essential for achieving that rich, creamy, and thick caramel consistency. If coconut is an issue, heavy cream (dairy-based) can be used as a substitute, but this will make the recipe non-vegan.
- Coconut oil: This ingredient acts as a binding agent in the crust and contributes to the overall texture of the cheesecake and the melting quality of the chocolate topping. Melted avocado oil can be a suitable alternative for similar results, or even vegan butter for a richer flavor.
- Yogurt: I prefer using unsweetened coconut yogurt for a dairy-free and tangy component in the cheesecake filling. The key is to use a very THICK yogurt; this will help achieve the desired firm, creamy consistency. If you’re not strictly dairy-free, a thick Greek yogurt can also work well.
- Peanuts: These provide that satisfying crunch and authentic Snickers taste within the caramel layer and as a topping. If you have a peanut allergy, feel free to swap them with another nut of choice, such as chopped almonds or pecans, or even sunflower seeds for a nut-free option. Ensure they are unsalted or adjust other salt amounts accordingly.
- Oats: Rolled oats form the delicious and wholesome crust layer of this cheesecake. If you’re looking for a grain-free alternative, nuts (like almonds or walnuts) can be used instead. Simply pulse them in your food processor until they reach a flour-like consistency or are in tiny bits, then proceed with the remaining crust ingredients.
- Cashews: For the cheesecake layer, raw cashews are essential for achieving the incredibly creamy, smooth texture. It’s crucial to soak them adequately before blending. Soaking in hot water for at least 20 minutes (or in cold water overnight) softens them, allowing them to blend seamlessly into a rich, velvety filling. Don’t skip this step for the best results!

Step-by-Step Guide to Crafting Your Vegan Snickers Cheesecake
While this cheesecake boasts multiple delightful layers, the process itself is surprisingly straightforward and enjoyable!
Base Layer: Begin by preparing your 8-inch springform cake pan. Lightly grease it and, if desired, line the bottom with parchment paper for extra easy removal. Add all the base ingredients – oats, almonds, maple syrup, and melted coconut oil – to your food processor. Process until the mixture comes together and forms a cohesive dough. If it seems too dry, a tablespoon or two of water can help it bind. Firmly press this mixture into the bottom of your prepared pan to create an even crust. Set this aside, or pop it into the freezer for a few minutes while you prepare the next layer.
Cheesecake Layer: Next, combine all the cheesecake layer ingredients – soaked cashews, peanut butter, coconut milk, coconut yogurt, maple syrup, melted coconut oil, lemon juice, vanilla extract, and a pinch of sea salt – into a high-speed blender. Blend for at least one minute, or until the mixture is incredibly smooth and completely free of any cashew bits. Taste the mixture and adjust the sweetness or flavor as needed. Carefully pour this creamy filling over your prepared crust. Place the pan in the freezer for about 40 minutes to an hour. This crucial step allows the cheesecake layer to firm up sufficiently so that the warm caramel layer doesn’t melt it upon application.
Caramel Layer: While your cheesecake is firming, it’s time to create the star of the show: the gooey caramel. In a small pot, combine the full-fat coconut milk, coconut sugar, coconut oil, vanilla, and a good pinch of sea salt. Heat this mixture over medium heat, bringing it to a boil while stirring very frequently to prevent sticking or burning. Once boiling, reduce the heat slightly and let the mixture simmer for 20-30 minutes. The cooking time can vary, so keep a close eye on it. Stir often as it simmers; you’ll notice it starting to darken in color and thicken into a rich, caramel consistency. Once it reaches your desired thickness, remove it from the heat and let it cool for a few minutes. It will continue to thicken as it cools. Once slightly cooled, gently pour the caramel over the firmed cheesecake layer, spreading it evenly. Immediately sprinkle the chopped peanuts over the caramel. Return the cheesecake to the freezer for another 30 minutes to allow the caramel layer to set.
Chocolate Layer: For the grand finale, prepare the chocolate topping. In a heat-proof bowl, combine your chocolate chips and a tablespoon of coconut oil (the oil helps create a smooth, pourable consistency). Heat this mixture in 20-second increments in the microwave, stirring thoroughly after each interval, until the chocolate is completely smooth and melted. Alternatively, use a double boiler for melting. Once melted, quickly pour the chocolate over the set caramel layer, spreading it out evenly and swiftly before it hardens. For an extra touch of gourmet, sprinkle a final pinch of sea salt over the chocolate. Place the entire cheesecake back into the freezer for at least 4 hours, or ideally overnight, before carefully slicing and serving. This extended chill time ensures all layers are perfectly set and easy to cut.
Storing & Serving Your Masterpiece
To maintain its exquisite texture and flavor, your vegan Snickers cheesecake should be stored in an airtight container in the freezer. When you’re ready to enjoy a slice of this delightful treat, simply remove it from the freezer and let it thaw at room temperature for about 10-15 minutes. This brief thawing period allows the layers to soften slightly, bringing out their creamy texture and enhancing the overall flavor profile. Enjoy this decadent dessert knowing it’s made with wholesome ingredients!
Other Candy-Inspired Recipes You’ll Love
If you’re a fan of healthier twists on classic candy bars, be sure to explore these other delicious recipes:
- Vegan Snickers Protein Bars
- Healthy Pecan Snickers Bars
- Healthier Vegan Butterfingers
- Snickers Chia Pudding
- Vegan Almond Joy Bars

Vegan Snickers Cheesecake
Pin Recipe
20 minutes
2 hours
2 hours
20 minutes
Dessert, Snack
American
12
1
kcal
Ingredients
Base
-
1
cup
old-fashioned rolled oats -
3/4
cup
almonds
*or other nut. Pecans work great! Can sub sunflower seeds for a nut-free option. -
1/4
cup
maple syrup -
2
tbsp
coconut oil
melted
Cheesecake layer
-
1 1/3
cups
cashews
*soaked in hot water for at least 20 mins -
1/3
cup
peanut butter -
3/4
cup
full-fat or light canned coconut milk -
1/3
cup
coconut yogurt
*or greek yogurt. I like unsweetened vanilla -
1/4
cup
maple syrup -
2
tbsp
coconut oil
melted -
2
tbsp
lemon juice -
1 1/2
tsp
vanilla extract - pinch of sea salt
Caramel Layer
-
1
can
full-fat canned coconut milk
***See notes for subs -
1/2
cup + 2 tbsp
coconut sugar -
1 1/2
tbsp
coconut oil
-
1
tsp
vanilla & good pinch of sea salt -
1/2
cup
peanuts
chopped
Chocolate Layer
-
1 1/2
cups
chocolate chips -
1
tbsp
coconut oil
*optional, to help thin it out
Instructions
Base
-
Grease an 8” spring form cake pan.
-
Add the base ingredients to a food processor, processing until it becomes a dough. If your mixture doesn’t hold together, add a tbsp or two of water & process again.
-
Pour the mixture into the bottom of a lined/greased 9″ pie pan and press it down firmly. Set aside.
Cheesecake Layer
-
Combine everything in a blender and blend for a minute or so until super smooth. Taste and adjust as you’d like (adding more sweetener if needed, etc).
-
Pour over the cookie base. Place in the freezer for an hour or so until the cheesecake layer is firm to touch. You won’t want the caramel layer to melt the cheesecake layer too much.
Caramel
-
While the cheesecake is firming up, make the caramel. Add the coconut milk, oil, and coconut sugar to small pot over medium heat, bringing it to a boil, being sure to stir frequently.
-
Turn down the heat a little, letting the mixture simmer for 20-30 minutes (sometimes this can take longer!). Stir pretty frequently to prevent burning.
-
The mixture will start to darken in color and reduce to a caramel consistency. Remove it from the heat & let it cool a few minutes, it’ll thicken up while it cools as well. You can stir in the peanuts or sprinkle them over top after you pour it onto the cheesecake.
-
Once it’s cooled down, pour the caramel over the cheesecake layer, gently spreading it out evenly. Sprinkle over the chopped peanuts if you didn’t stir them in. Place back in the freezer for 30 minutes or so to let that layer firm up.
Chocolate layer
-
When ready to make the chocolate layer, add the chocolate chips to a heat-proof bowl with the coconut oil. Heat in 20 second increments, stirring well between each one, until smooth. Pour it over the caramel layer, quickly spreading it over top.
-
Top with sea salt and place back in the freezer for at least 4 hours-overnight before cutting into slices.
Video
Notes
**When it comes to the melted fat in the base, you have several options beyond coconut oil. Ghee, vegan butter, traditional butter, or even avocado oil can work beautifully, each imparting a slightly different flavor and texture.
***While full-fat canned coconut milk is ideal for a rich, thick caramel, you can certainly try using light canned coconut milk. Just be aware that the resulting caramel may not be as luxuriously thick or deeply rich in flavor – it will still be delicious, but with a lighter consistency.
caramel, cheesecake, Chocolate, healthy dessert, No Bake Recipe, raw vegan, snickers, vegan cheesecake
