Effortless 4-Ingredient Chili Cheese Dip: Your Ultimate 15-Minute Party Starter
Looking for a crowd-pleasing appetizer that requires minimal effort but delivers maximum flavor? This delightful 4-ingredient chili cheese dip is your perfect solution! Crafted in just 15 minutes, it’s an ideal addition to your next party, game day gathering, or potluck. Rich, cheesy, and incredibly satisfying, this dip promises to be the star of any spread.

What Makes This 4-Ingredient Chili Cheese Dip So Irresistible?
- Unbelievably Easy & Quick: This recipe is a true testament to simplicity. With just four core ingredients, you can whip up this fantastic dip in under 15 minutes, from prep to bubbling perfection. It’s the ultimate last-minute appetizer that tastes like you spent hours in the kitchen, making it perfect for unexpected guests or when you’re short on time but refuse to compromise on flavor.
- A Guaranteed Crowd-Pleaser: The classic combination of hearty chili and melted cheese is universally loved. This dip consistently disappears fast at any gathering, from casual game-day parties to festive holiday potlucks. Its comforting, savory profile appeals to all ages, ensuring everyone, even the pickiest eaters, will come back for more.
- Minimal Mess, Maximum Flavor: You’ll only need one mixing bowl and a baking dish (or an oven-safe skillet) to create this culinary delight. This means significantly less cleanup after the party, allowing you to spend more time enjoying your guests and less time scrubbing dishes. It’s truly the best recipe to throw together when you crave something delicious without the hassle.
Essential Ingredients for Your Perfect Chili Cheese Dip
Achieving a delicious chili cheese dip with just four ingredients highlights the power of choosing the right components. Each plays a crucial role in creating the dip’s signature texture and taste.
Chili: The Hearty Foundation
Any type of chili will work wonders in this recipe, offering incredible versatility. This chili cheese dip is an excellent way to use up any leftover homemade chili you might have lingering in the fridge, giving it a delicious second life. While homemade chili often boasts the freshest flavors and allows for customization, a good quality canned chili tastes absolutely amazing and makes preparation even faster. When choosing canned chili, consider your preference for beans (with or without) and spice level (mild, medium, or hot) to tailor the dip to your liking. Look for varieties with a rich, thick consistency for the best results, as watery chili might make the dip less cohesive.
Cream Cheese: For Unmatched Creaminess and Tang
Plenty of tangy cream cheese is the secret to this dip’s luxurious, melt-in-your-mouth texture. It melts beautifully, blending seamlessly with the chili and cheddar to create a smooth, rich base. It’s essential to use plain cream cheese for this recipe, as any flavored varieties could overpower or clash with the chili’s robust taste. Whether you opt for full-fat cream cheese for maximum richness, whipped cream cheese for an airier texture, or a low-fat option for a lighter touch, ensure it’s at room temperature for easier mixing and a smoother consistency.
Cheddar Cheese: The Classic Cheesy Finish
Two cups of shredded cheddar cheese give this dip an incredible, sharp bite and that signature golden, bubbly crust. Cheddar is a classic choice for chili and cheese combinations due to its robust flavor and excellent melting properties. While cheddar cheese is a personal favorite for its distinctive taste, you can absolutely use your favorite shredded cheese instead. A shredded Mexican blend cheese would offer a delightful mix of flavors and melt beautifully, or even shredded pepper jack for an extra kick of spice that complements the chili perfectly. For the best melt and flavor, consider shredding a block of cheese yourself rather than using pre-shredded varieties, which sometimes contain anti-caking agents that can affect texture.
Salsa: A Burst of Fresh, Zesty Flavor
Salsa is a powerhouse ingredient that yields the most flavor for this dip, adding brightness, acidity, and a touch of zest without requiring multiple chopped vegetables. Its combination of tomatoes, onions, peppers, and spices perfectly complements the richness of the chili and cheese. You can choose a mild, medium, or hot salsa depending on your preference for spice. If salsa isn’t available or you prefer a different flavor profile, you can replace it with 1/4 cup of either fire-roasted diced tomatoes for a smoky depth or diced tomatoes with green chilies (like Rotel) for a mild, vibrant kick. Ensure any tomato products are drained well to prevent the dip from becoming too watery.

Chef’s Tips to Elevate Your Chili Cheese Dip
While this 4-ingredient chili cheese dip is fantastic as is, a few simple tweaks can customize it to your taste and make it even more spectacular. Here are some expert tips to guide you:
- Bulk It Up for a Heartier Meal: To transform this dip into an even more substantial snack, appetizer, or side dish, feel free to add an extra half-pound of cooked ground beef, turkey, or even shredded chicken. Brown the meat thoroughly, drain any excess fat, and then mix it in with the other ingredients. You can also incorporate additional vegetables like finely diced bell peppers, corn, or black beans (drained and rinsed) to add more texture and nutritional value. Sautéing these vegetables briefly before adding them can enhance their flavor and ensure they are tender.
- Effortless Make-Ahead Preparation: This dip is incredibly forgiving and perfect for preparing in advance. Simply mix all the ingredients (chili, cream cheese, half of the shredded cheddar, and salsa) in a bowl, then transfer the mixture to your chosen baking dish. Top it with the remaining shredded cheese, cover tightly with plastic wrap or aluminum foil, and store it in the refrigerator for up to 3 days. When you’re ready to serve, just pop it into the preheated oven and bake until golden and bubbly. This foresight allows you to enjoy your event without last-minute kitchen stress.
- Amplify the Heat for Spice Lovers: If you crave a more intense flavor experience, it’s easy to dial up the heat. Incorporate a few shakes of chili powder, a couple of dashes of your favorite hot sauce like Frank’s Red Hot or Tabasco sauce, or even a pinch of cayenne pepper directly into the mix. For fresh spice, finely dice a jalapeño (remove seeds for less heat, keep them for more) or even a serrano pepper and stir it in. Serving extra hot sauce on the side also allows guests to customize their spice level.
- Creative Serving Suggestions: Beyond the classic tortilla chip, this versatile dip pairs wonderfully with a variety of dippers. Try serving it with sturdy corn chips (like Fritos), pita bread wedges, slices of crusty baguette, or even a medley of fresh-cut vegetables like carrot sticks, celery stalks, and bell pepper strips for a lighter option. For a fun party presentation, hollow out a round loaf of bread and serve the dip inside as a delicious edible bowl. This dip also makes an excellent topping for baked potatoes, hot dogs, or even as a flavorful filling for tacos and burritos.
- Garnish for a Professional Touch: A little garnish goes a long way in making your dip visually appealing. Before serving, consider sprinkling fresh chopped cilantro or green onions over the top for a burst of color and freshness. A dollop of sour cream or Greek yogurt in the center, a drizzle of extra hot sauce, or a light dusting of smoked paprika can add both visual appeal and an extra layer of flavor.
- Storing and Reheating Leftovers: If you happen to have any leftovers (which is rare!), store them in an airtight container in the refrigerator for up to 3-4 days. To reheat, you can gently warm it in the microwave in short bursts, stirring occasionally, or transfer it back to a small baking dish and warm in the oven at 300°F (150°C) until heated through and bubbly again. Add a splash of milk or broth if it seems too thick after refrigeration.
More Delicious and Easy Dip Recipes
- Instant Pot Buffalo Chicken Dip
- Whipped Cottage Cheese (Sweet or Savory)
- Loaded Baked Potato Dip
- Crockpot Queso Dip
- Crockpot Spinach Artichoke Dip
- Crab Rangoon Dip
If you loved this incredibly easy and delicious chili cheese dip recipe, don’t forget to leave us a review below. Your feedback helps us share more amazing recipes! ★ Follow Easy Healthy Recipes on Pinterest, Facebook, and Instagram, too!
For even more delicious and simple recipes, be sure to visit our sister sites, 40 Aprons and Easy Cheap Recipes.

4-Ingredient Chili Cheese Dip
 Cheryl Malik
Print
SaveSaved!
Ingredients
- 2 cup chili or 1 15-ounce can chili (choose your preferred type: with or without beans, mild or spicy)
- 8 ounces plain cream cheese (softened, full-fat or low-fat)
- 2 cups shredded cheddar cheese divided (freshly shredded for best melt, or substitute with Monterey Jack or Mexican blend)
- ¼ cup salsa (mild, medium, or hot; ensure it’s not too watery)
Equipment
-
Large mixing bowl
-
Baking dish or oven-safe skillet (approx. 8×8 inch or similar)
Instructions
-
Preheat oven to 350° Fahrenheit (175°C). Ensure your cream cheese is softened for easier mixing.
-
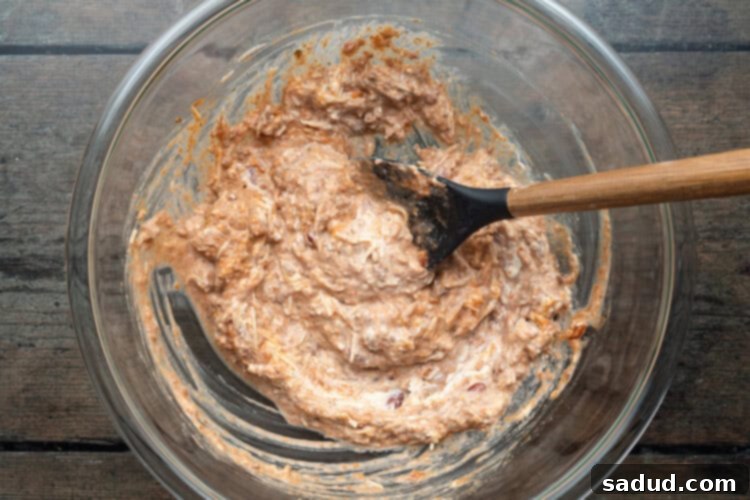
In a large mixing bowl, combine the chili, softened cream cheese, 1 cup of shredded cheddar cheese (reserve the other cup for topping), and salsa. Mix thoroughly until all ingredients are well incorporated and the dip is smooth.

-
Transfer the delicious mixture to your chosen baking dish or oven-safe skillet. Evenly spread it out, then generously top with the remaining shredded cheddar cheese. Bake for 10 minutes, or until the dip is hot, bubbly around the edges, and the cheese on top is melted and slightly golden.

Notes
- Make it Keto-Friendly: To keep this dip keto-friendly, ensure you use a low-carb chili (check labels carefully, as some canned chilis can be high in sugar and carbs). Opt for freshly shredded cheddar cheese (as pre-shredded varieties may contain starches). Serve this hearty dip with fresh-cut low-carb vegetables like bell pepper strips, celery sticks, cucumber slices, or even pork rinds for dipping.
- Vegetarian Option: For a delicious vegetarian version, simply use your favorite meatless chili or a flavorful bean chili. The creamy cheese and salsa will still provide an abundance of flavor and make for a satisfying dip.
- Spice Customization: Adjust the spice level by choosing a mild, medium, or hot salsa. For an extra kick, add a pinch of cayenne pepper, a few dashes of your favorite hot sauce, or some finely diced jalapeños (seeds removed for less heat).
Nutrition Information
Number of total servings shown is approximate. Actual number of servings will depend on your preferred portion sizes.
Nutritional values shown are general guidelines and reflect information for 1 serving using the ingredients listed, not including any optional ingredients. Actual macros may vary slightly depending on specific brands and types of ingredients used.
To determine the weight of one serving, prepare the recipe as instructed. Weigh the finished recipe, then divide the weight of the finished recipe (not including the weight of the container the food is in) by the desired number of servings. Result will be the weight of one serving.


